top of page

Updated: Jul 3, 2023

Have you ever wanted to explore dinosaurs like a true paleontologist? Well guess what guys, you can and will using this fun and easy 3 ingredient recipe AND free downloadable file to share with your crew!


So get those picks and shovels ready folks...actually a large bowl, measuring cup, and hands will do, and get ready to create your own fossilized egg!


Fossil Egg Recipe

For this project you will need to gather the following...

Large Mixing Bowl, Measuring Cups, Toy Surprise, Play Sand, Cornstarch, Water


- In a large bowl mix 2 Cups of sand to 1 Cup of cornstarch.


- Add water SLOOOOOWLY. If you add too much you get Oobleck and that's a whole other sensory fun party. If you do get too wild with the water just add more sand and cornstarch until dough holds shape.


- Next, grab a handful of your mixture and make a small pancake in one hand and add your surprise. Cover with more mixture.


- Now you can mold your mixture into an egg! I did this by cupping my hands together and squeezing.


- Set aside to air dry. Allow this step to take a couple of days and try to try to be patient, trust me it's worth it!


My final eggs were paired with the recipe and blunt tipped candy apple skewers but there are so many fun ways to give yours to pals. I might even hide some around the house this Easter!


HAVE FUN!


12 views0 comments

I love making sensory bins but always feel as if there's never enough, a recent afternoon party proved me wrong. So wrong in fact that I just had to share the details so you can create it yourself and share the fun with your lil' paleontologists!


I had 4 sensory stations set up and while I manned the lava flow the kids were free to roam the room and explore more. You can choose to do all 4 or just one! Here was the setup...


1. Kinetic Sand Dino Dig- Using a small deep IKEA bin (items are located on table), I loaded it with 5.5lbs of Kinetic Sand. Along with the sand I hid here and there Dino fossils and included a dinosaur chart nearby so the kiddos could match the fossils to their names by noticing specific body characteristics.


Included on this table were magnifying glasses, dry paint brushes, small bin with water and small nail brushes so kids could "clean" off their discovered fossils.


These guys loved being able to dig, find, clean, then chart their findings!


2. Colored Rice Dig- This was probably the most used bin and in my mind I giggled thinking to myself, "We are going to need a bigger bin". The kids had so much fun with this one and with minimal effort on my end! I added fossils to the rice as well as scoops, funnels, a magnifying glass, and cardboard tubes.


Rice Coloring Recipe/Supplies- White Rice, Gel Food Coloring, White Vinegar, Large Freezer Bags, Wax Paper, Large Cookie Sheet


- Separate rice into freezer bags (I did 2 cups each bag).


- Add food coloring. 3 colors is always pleasing to the eyes but if you really want to blow kids minds, go further and do the rainbow!


- Add 1tbsp ( 1tsp if doing smaller batches) of vinegar to each bag. This step helps spread and hold the color to the grains of rice.


- Now the fun part!


- Let out air from the bag and zip it tight. Begin smooshing the rice around and around until all the rice is full of that gorgeous color.


- Get yourself a cookie sheet lined with wax paper and dump out the rice into a thin layer.


- Air dry for at least an hour.


TIP- There are recipes where you can bake the rice at a low temp to speed up the drying process but I prefer air drying. You can do outside in the sun or inside in a dry safe space. Run your hand over the grains now and again until dry. This process takes about 1 hour.


3. Volcano Eruption Bin- Okay guys, this was the favorite next to the rice bin and kind of a no brainer as to why. Kids LOVE science! You can research age appropriate discussions on this chemical reaction or just have them experiment on their own. One I found useful for my 4+ party was this fun video via, YouTube. https://www.youtube.com/watch?v=_CYgsqji_0k


Three volcanoes were made for this bin and each one covered tall narrow bottles which sat inside to hold all the ingredients, two volcanoes were made from corrugated cardboard the other a large foam sheet. The foam sheet volcano made it to the end and I highly suggest using this material instead of cardboard so as to reuse it for another day. But if you are like me and hoard cardboard then by all means, upcycle away!


TIP-Be sure to use staples to hold your volcano closed and not glue or tape due to the heavy amount of liquid.


For a fun and safe interactive explosion here is what you will need.


Eruption Recipe- Baking Soda (Base), White Vinegar (Acid), Dish Soap (Optional but adds more bubbles and I felt slowed down the chemical change.), Gel Food Coloring, Large Bin or Cookie Sheet, Volcano Materials (Cardboard or Foam Sheet), Scissors, Stapler, Empty Water Bottle, Squeezable Condiment Bottle or Pipette, Eye Protection or Wet Paper Towel (Vinegar + Eyes = Tears)


- Make your cone using material of choice and staple to secure. Be sure to make your cone the same height as water bottle which will hold your fizzy ingredients.


- Once you have your volcanoes constructed now you can get ready to have a fizzy partay!


- In your empty water bottle add baking soda and food coloring. Shake it a bit to get the coloring mixed with the baking soda. Don't worry about mixing it too well.


- Place your volcano over empty bottle.


- Using a squeezable condiment bottle filled with vinegar, or your pipette, start filling your volcano up with vinegar.


WHOA, NELLY! What is happening? Is the lava flowing fast or slow? Is it cold or hot?


TIP #1 - No more vinegar? No worries, try and scoop up from your bin or cookie sheet some of the liquid that was already used.


TIP #2 - Adding vinegar to baking soda gives you an immediate reaction whereas adding baking soda to vinegar delays the reaction. Have fun experimenting!


4. Dino-dough - This was a bin using homemade playdough, a dowel roller, and mini dinosaurs.

(See attached for dough recipe.)


Well there you have it!

Use these recipes to cater to your own theme and just know that while these stations do take time to prepare, you can easily reuse them given the proper storage and will last up to 2 weeks.

Air tight lid bins are highly suggested.


Looking to make this experience even more GINORMOUSLY fun? Make this fossilized egg!

(See seperate blog post for downloadable recipe and process pics.)


16 views0 comments

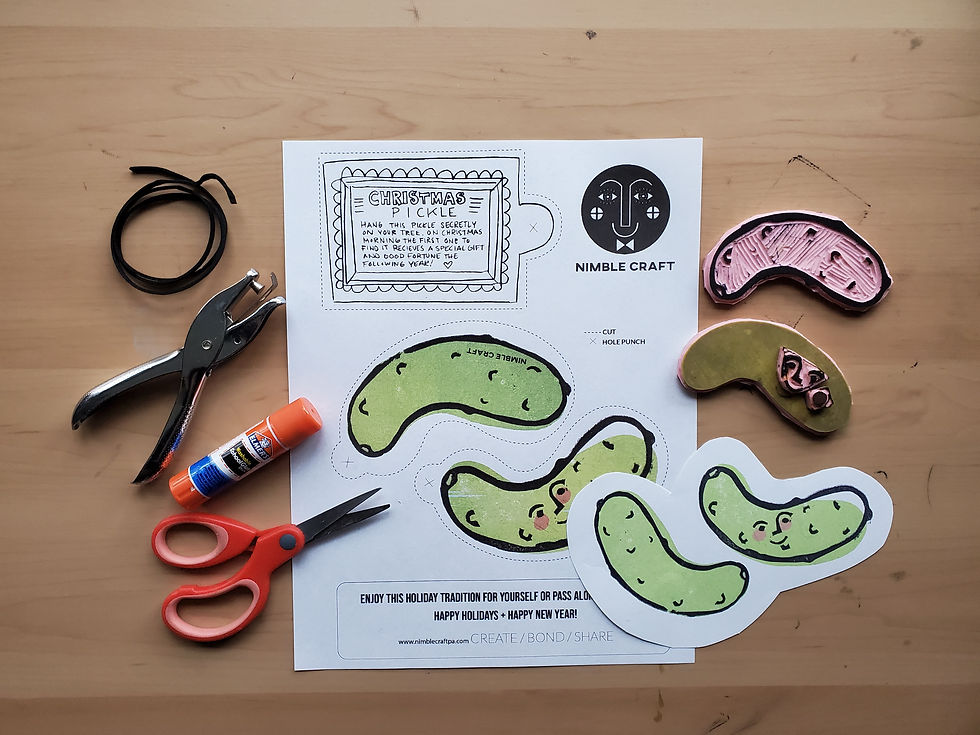
Holiday traditions how do I love thee, Christmas light car rides where the kids bring in pillows and blankets while me or my hubs drive aimlessly (competing to who can find the best dressed up homes), fancy dinners with pals sans kids, Santa selfies!...but traditions in pickle form, uhmm yes please. And for those of you familiar with or unfamiliar with this fun tradition, this one's for you including a free tree pickle ornament download in celebration of the first day of Winter!


The Tree Pickle Tradition / Hang a pickle ornament on your tree secretly, on Christmas morning the first one to find it on the tree gets a gift and good luck the following year! This is pre elf folks and is probably why I love it so. That and it's kooky and fun!


Origin of The Tree Pickle...we think? / This tradition has no exact origin but here is text taken from Wikipedia:

This tradition is commonly believed by Americans to come from Germany and be referred to as a Weihnachtsgurke, but this is probably fictitious. It has been suggested that the origin of the Christmas pickle may have been developed for marketing purposes in the 1890s to coincide with the importation of glass Christmas tree decorations from Germany. Woolworths was the first company to import these types of decorations into the United States in 1890, and glass blown decorative vegetables were imported from France from 1892 onwards. Despite the evidence showing that the tradition did not originate in Germany, the concept of the Christmas pickles has since been imported from the United States and they are now on sale in the country traditionally associated with it.

One suggested origin has been that the tradition came from Camp Sumter during the American Civil War. The Bavarian-born Private John C. Lower had enlisted in the 103rd Pennsylvania Infantry, but was captured in April 1864 and taken to the prison camp. As the story is told, on Christmas Eve he begged a guard for a pickle while starving. The guard provided the pickle, which Lower later credited for saving his life. After returning to his family, he began a tradition of hiding a pickle on their Christmas tree each year.


Today / Personally I enjoy this tradition more than the origin and love seeing the kids anticipation when they catch a glance of our pickle amongst the other treasured ornaments. Our tradition is that every year we buy a glass ornament to represent the year passed...haven't googled "glass mask ornaments" yet but I'm sure they are out there.


Regardless of any specific traditions I hope you all have a very special and healthy holiday and an amazing new year! 2022 has a good ring to it.


XOX


DOWNLOAD HOW TO / Feel free to download my tree pickle design to start your own tradition OR if you'd like, pass him along to others! I suggest a heavy cardstock (if your printer can take it) for this project, but gluing your two sides together with standard copy paper is very sturdy, just won't stand the test of time.

  1. Cut your pickle images front + back as well as his tag (optional) on the dotted lines.

  2. Using a glue stick, glue your two sides together.

  3. Trim edges to make both sides even.

  4. Using a hole punch, punch over the marked "X" on your pickle and tag (optional).

  5. Attach cording of choice and add your tag.

  6. Enjoy!

Take It Up A Notch / Use this download to print your image on printable heat transfers. This way you can create your own tree pickle stuffie ornament! I used a simple and pretty blanket stitch when done, perfect for hiding any hand sewn blemishes after stuffing.


40 views0 comments
1
2
bottom of page